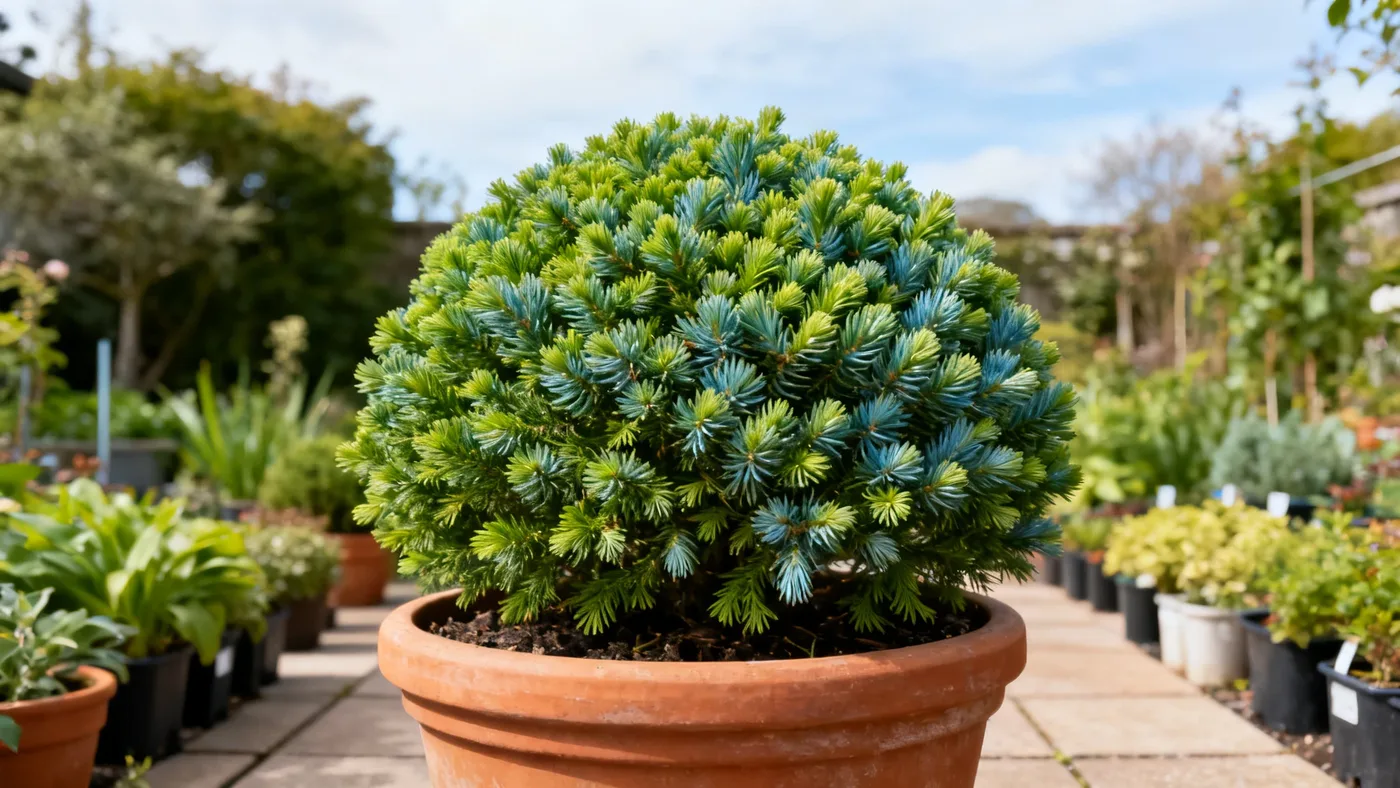
Growing Dwarf Japanese Cedar in Pots and Containers
Dwarf Japanese Cedar makes an excellent choice for container gardening. The slow growth rate, compact mounded form, and soft blue-green foliage work well in pots, patios, and small spaces where an in-ground planting isn't practical. Unlike many dwarf conifers, Dwarf Japanese Cedar actually thrives in containers when given consistent moisture and well-draining soil. This guide walks you through selecting, planting, and maintaining Cryptomeria japonica 'Globosa Nana' in pots.
Why Container Growing Works for Dwarf Japanese Cedar
Dwarf Japanese Cedar is commonly sold in nurseries in quart and #3 containers, which means growers have already validated that this plant performs well in a pot during its formative years. What distinguishes container-growing from in-ground planting is control: you manage the exact soil composition, water schedule, and microclimate your cedar receives. This is particularly useful if your garden has heavy clay, poor drainage, or salty conditions that would stress the plant outdoors. Potted specimens also allow you to move the plant to a more sheltered location during the harshest winter weather or the hottest, driest parts of summer.
A key consideration is maturity. Dwarf Japanese Cedar grows slowly, roughly 3 to 6 inches per year, and will reach 3 to 6 feet tall and 4 to 6 feet wide over many years. A well-tended container-grown specimen can remain attractive for a decade or more, though eventually you may need to move it to larger quarters or the ground if you want it to keep growing.
Materials and Supplies You'll Need
Before you begin, gather the following items:
- Container (see sizing guidance below)
- Potting soil or a specialized acid-loving plant mix (azalea or rhododendron blend)
- Perlite or coarse sand (to improve drainage if needed)
- A young Dwarf Japanese Cedar plant (usually in a quart or #3 container from a nursery)
- Mulch (optional, for moisture retention and temperature buffering)
- Watering can or hose with a gentle spray
- Balanced or acid-formulated fertilizer (azalea or rhododendron type)
- Pruning shears (for minimal tidying in late winter)
- Gloves (foliage is soft but trimming can leave minor scrapes)
Choosing the Right Container
Container size directly affects how often you water and how much root development space your cedar has. For a young Dwarf Japanese Cedar from a nursery, start with a pot that is 2 to 4 inches larger in diameter than the nursery container. A 3-gallon or #3 pot (roughly 12 inches in diameter) is a common starting size.
Material matters. Ceramic, stone, or heavy plastic pots insulate roots better than thin plastic and are less likely to tip over as the plant grows and fills with foliage. Fabric pots drain quickly but dry out faster, requiring more frequent watering. Whatever you choose, ensure the pot has drainage holes; standing water suffocates roots and leads to root rot, one of the most common Dwarf Japanese Cedar problems.
If your climate falls within USDA zones 5 to 9, you can leave the container outdoors year-round. However, roots in containers are more exposed to temperature swings than in-ground plants, so in zones 5 and 6, consider moving the pot to a sheltered location or wrapping it with insulation during the coldest months.
Soil Preparation
Dwarf Japanese Cedar prefers moist, humus-rich, well-drained soil with an acidic pH of roughly 5.0 to 6.5. Generic potting soil is often too dense and retains too much water. Instead, use a specialized acid-formulated mix designed for azaleas and rhododendrons, or blend standard potting soil with 20 to 30 percent perlite or coarse sand to improve drainage.
The goal is a substrate that holds moisture without waterlogging. When you squeeze a handful of moist potting mix, it should hold together briefly, then crumble apart when you release it. If it stays in a tight ball, add more perlite.
Before filling your container, place a layer of gravel or coarse bark (1 inch deep) at the bottom to ensure water flows freely and does not pool around the roots.
Step-by-Step Planting Instructions
- Prepare the pot. Add the drainage layer of gravel or bark to the bottom of the container.
- Fill halfway with soil. Pour your prepared potting mix into the container until it reaches approximately the midpoint.
- Remove the cedar from its nursery pot. Gently slip the plant out, supporting the base of the trunk with one hand. Loosen the root ball slightly with your fingers to encourage new root growth.
- Position the cedar in the pot. Place it so the top of the root ball sits at or just below the rim of the new container. Burying the trunk deeper encourages rot.
- Fill around the root ball. Add potting mix around the sides until the pot is full and the root ball is fully supported. Press gently but firmly to eliminate large air gaps.
- Water thoroughly. Saturate the soil until water drains freely from the bottom. This settles the soil and eliminates remaining air pockets.
- Add mulch (optional). Spread 1 to 2 inches of bark mulch on top of the soil, keeping it a few inches away from the trunk.
The best planting time is spring or early fall, when temperatures are mild and the plant has time to establish roots before temperature extremes arrive.
Watering and Moisture Management
Container-grown Dwarf Japanese Cedar requires consistent moisture. The soil should feel damp to the touch but never soggy. Check the top inch of soil every few days by inserting your finger; if it feels dry, water. During hot or windy weather, you may need to water every day. In cool spring or fall, twice weekly might suffice.
Use a watering can or gentle hose spray to avoid compacting the soil. Water at the base of the plant, not overhead, to minimize wet foliage and reduce disease risk. Drainage is critical. If water pools on the surface or sits in the saucer for more than a few minutes, improve drainage by adding perlite to the soil or moving the pot to a location where excess water can escape freely.
During winter, watering needs drop significantly, but do not let the soil dry out completely, even if the plant is dormant. Evergreen foliage still loses moisture through transpiration.
Fertilizing Your Container-Grown Cedar
Containerized plants have limited access to soil nutrients, so light annual feeding supports healthy growth. In early spring, apply a balanced fertilizer (such as 10-10-10) or an acid-formulated fertilizer designed for azaleas and rhododendrons. Follow the product label for dosage, as concentration varies widely.
Do not over-fertilize. Excessive nitrogen promotes soft, weak growth and can increase pest pressure. Once-yearly feeding in spring is sufficient for Dwarf Japanese Cedar. If the foliage looks pale or growth stalls, that is a signal to check drainage and watering consistency before adding more fertilizer.
Light and Location
Dwarf Japanese Cedar grows best in full sun to part shade. If you live in a region with hot, dry summers, afternoon shade helps reduce foliage scorch and limits water stress. A location that receives 4 to 6 hours of direct sunlight and afternoon protection is ideal in hot climates.
Wind exposure matters for containerized plants. Strong winds can desiccate foliage and tip over pots. Place your cedar in a spot sheltered from sustained wind gusts, such as near a wall or fence. This is especially important while the plant is young and root establishment is not yet complete.
Managing Seasonal Changes
Dwarf Japanese Cedar is evergreen and will retain its soft blue-green needles year-round. However, foliage often takes on a bronze or purple cast during cold winter weather, particularly in zones 5 and 6. This color change is a normal response to low temperatures and does not indicate disease or distress. Foliage will return to its typical blue-green color when temperatures warm in spring.
In late winter to early spring, minimal pruning may be desired if the plant has grown unevenly or you wish to refine its shape. Avoid cutting into bare, old wood, which may not resprout. Prune only soft, new growth, and do this before the spring flush begins.
Troubleshooting Common Problems
Browning or scorched foliage: This usually signals drought stress or wind damage. Ensure watering is consistent and consider relocating the pot to a more sheltered spot. Young, newly planted cedars are especially vulnerable; consistent moisture is non-negotiable in the establishment phase.
Foliage dieback: Waterlogged roots are the prime culprit. Check drainage holes and soil composition. If the pot is sitting in standing water, move it immediately. Let the soil dry slightly and ensure perlite or coarse materials make up at least 20 to 30 percent of the mix.
Spider mites: Hot, dry conditions favor these tiny pests, which cause stippling and discoloration on needles. A forceful spray of water from the hose can dislodge mites. Increase humidity around the plant if possible and keep foliage from getting too hot and dry.
Scale insects: Small, bumpy clusters on stems and needles indicate scale. Manual removal with a soft brush or cloth and horticultural oil applied per label instructions usually controls small infestations on container plants.
Cercospora leaf and twig blight: This fungal disease causes browning of needles and twigs. Improve air circulation, avoid overhead watering, and remove affected branches promptly. If the problem persists, consult a local extension service for fungicide recommendations suited to your region.
When to Repot
A healthy, actively growing Dwarf Japanese Cedar will gradually fill its container with roots. Every 2 to 3 years, check if roots are circling the soil surface or emerging from drainage holes. When this occurs, move the plant to a pot that is 2 to 4 inches larger in diameter and refresh the potting soil. Late winter or early spring is the best time.
Alternatively, if the plant has reached your desired size and you want to keep it in the same pot indefinitely, perform root pruning instead. Carefully remove the plant from the pot, trim about one-third of the outer root mass with clean shears, and repot it with fresh soil. This technique keeps the plant stable in size.
Can You Successfully Grow Dwarf Japanese Cedar Long-Term in a Container?
Yes, with proper care. The slow growth rate of Dwarf Japanese Cedar, roughly 3 to 6 inches per year, means the plant will remain proportionate to a large container for many years. However, long-term (20+ years), the plant will outgrow any container and either need to be transplanted into the ground or root-pruned on a regular schedule.
For consistent results, focus on the basics: well-draining acidic soil, consistent moisture without waterlogging, and adequate light. These three elements matter far more than fancy containers or premium fertilizers. Once you've nailed those, confirm your USDA hardiness zone to ensure the plant can survive winter outdoors, and your potted cedar will reward you with years of soft, reliable foliage.
Container Care Quick Reference
| Task | Timing | Details |
|---|---|---|
| Planting | Spring or early fall | Use #3 or larger container; acidic, well-draining mix; water thoroughly |
| Watering | Regular, year-round | Keep soil consistently moist but not waterlogged; check weekly |
| Fertilizing | Early spring | Light annual feeding with balanced or acid-formulated fertilizer |
| Pruning | Late winter to early spring | Minimal; remove dead wood, avoid cutting bare old wood |
| Repotting | Every 2-3 years if growing | Move to pot 2-4 inches larger; refresh soil in early spring |
| Winter care | Fall to spring (zones 5-6) | Expect foliage to bronze/purple; move to shelter if desired; do not let soil dry |
| Pest/disease check | Monthly during growing season | Watch for spider mites, scale, or browning; improve drainage and air flow if issues appear |